The Morning My Synology NAS Went Silent
How I brought my Synology NAS back to life. Starting with quick checks, discovering a hidden debug tool, and finally fixing the network issue.
Table of Contents
It’s early morning, and I can’t connect to my Synology NAS DS1522+ over the local network. After running without any issues for two months, it suddenly became undiscoverable. Data synchronization jobs stopped on my laptop. All SMB connections dropped. I can’t access the NAS via QuickConnect or Tailscale either.
This is the story of my journey to debug a networking issue with my Synology NAS and bring it back to life. I’ll walk you through my troubleshooting process, starting with quick checks and gradually digging deeper to find the root cause. Even if you don’t own a NAS, I encourage you to read on. The approach I took and the tools I discovered along the way might give you a fresh perspective and help you solve entirely different technical challenges.
Basic Troubleshooting: No Quick Fix in Sight
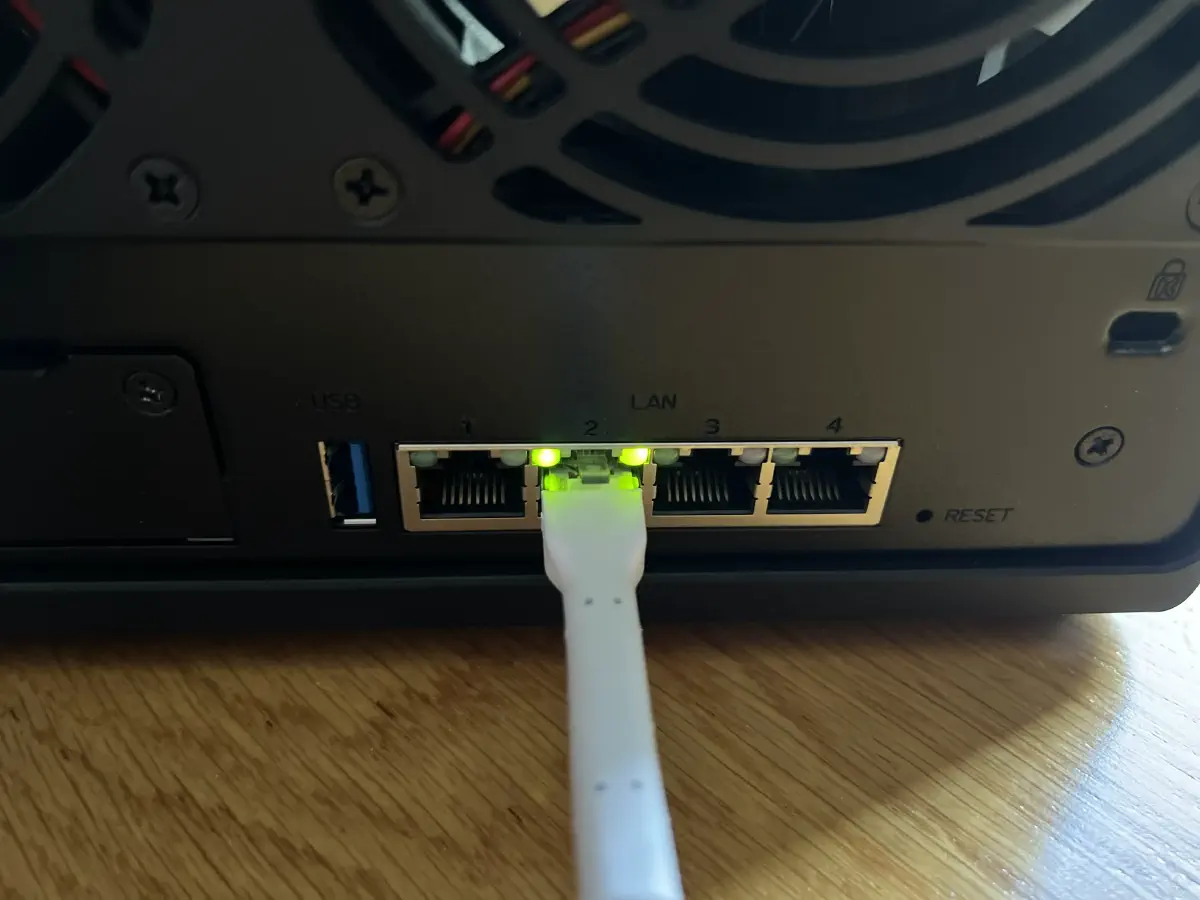
I restart the NAS. No connection. My router shows the NAS in the list of disconnected clients but provides no additional details in the logs. I restart the router, try a new Ethernet cable, and use different LAN ports on both the NAS and the router. Same issue. The NAS power indicator is solid green. The LAN LEDs are green, indicating no issues with the physical connection, as shown below.
I didn’t set a static IP address when initially configuring my NAS. Typically, reconnecting to a different LAN port should trigger a DHCP request because the network interface initializes a new connection, potentially requiring a new IP address. But that doesn’t happen.
In rare cases, a NAS might fall back to a static IP configuration if the DHCP client fails to initialize. I’m wondering if the NAS switched to using a static IP. In this case, the router would have detected the expired lease and returned the IP to the pool of available addresses. Another client might have taken it, potentially causing an IP conflict.
I check all connected clients but don’t see the NAS IP assigned to any device. This makes me think that the NAS might be using a completely different IP, possibly outside the expected range on my local network. But I still want to be sure it’s not a router issue. Let’s connect the NAS directly to my MacBook.
Narrowing It Down: Direct Connection and Network Scanning
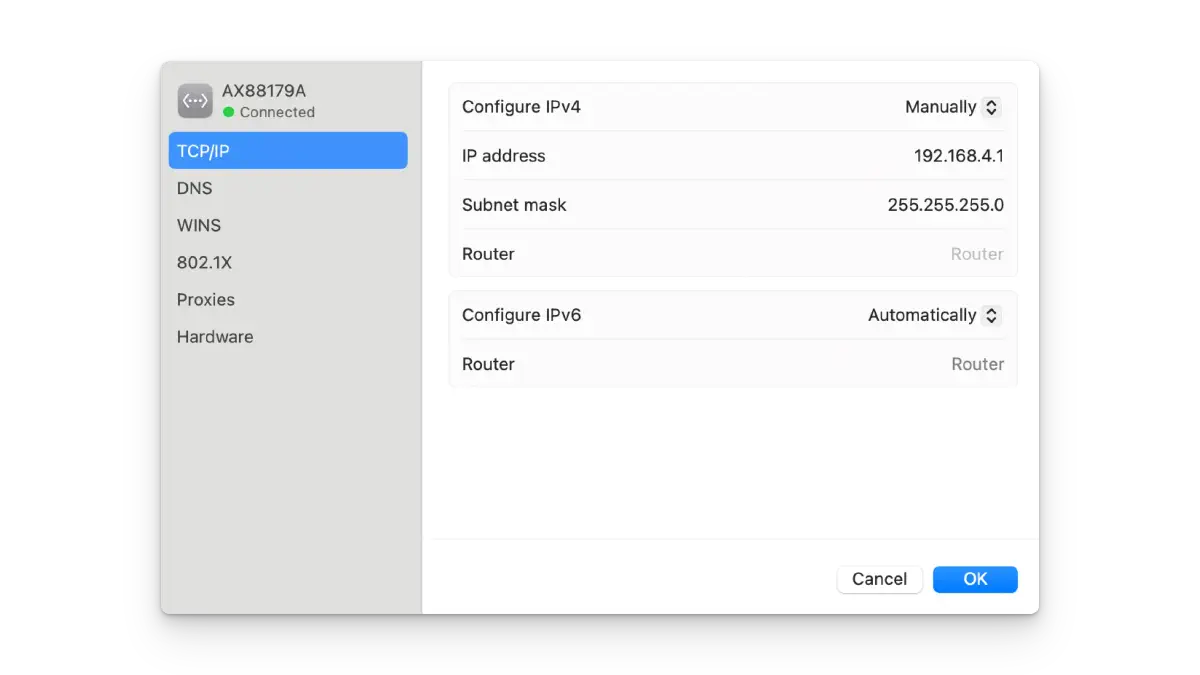
I disable Wi-Fi and use a direct Ethernet connection between the NAS and my MacBook to isolate the issue. I want to be sure that no other network components are interfering with the connection. On the MacBook, I open the network settings and configure the Ethernet-to-Type-C adapter to use manual IPv4 settings, as shown below. This is the same range where the NAS IP was last seen.
Synology provides a tool called Web Assistant that helps discover NAS devices on the local network. I run the Web Assistant, but it detects nothing. Next, I decide to scan all available IPs in this isolated network, which consists of just the NAS and the MacBook.
I use a network scanning tool called nmap, which checks each IP in a specified range to see if it is reachable. The -sn flag skips port scanning, which speeds up the process since I only need to check for active hosts. I run the following command:
❯ nmap -sn 192.168.4.0/24
Nmap scan report for 192.168.4.1 # MacBook IP address
Host is up (0.0013s latency).
Nmap done: 256 IP addresses (1 host up) scanned in 0.01 seconds
The output shows only the IP of my MacBook. For comparison, here’s the expected output when the NAS is visible on the network:
❯ nmap -sn 192.168.4.0/24
Nmap scan report for 192.168.4.1 # MacBook IP address
Host is up (0.00056s latency).
Nmap scan report for 192.168.4.231 # NAS IP address
Host is up (0.0010s latency).
Nmap done: 256 IP addresses (2 hosts up) scanned in 21.58 seconds
This confirms that the router is not causing the issue. Something is wrong with the NAS itself. It’s time to reset it.
Resetting the NAS: Soft vs. Hard Modes
Synology gives you two ways to reset a NAS :
- Soft reset restores the admin account to default and resets the network interfaces to use DHCP.
- Hard reset performs everything a soft reset does but also removes the Synology DiskStation Manager (DSM), the Linux-based operating system that the NAS runs on.
I press and hold the RESET button for about 4 seconds until I hear a beep. I release the button and launch the Web Assistant. Nothing happens. I restart the NAS, but the issue persists. The NAS remains undiscoverable. At this point, I suspect a problem with the DHCP client. If the DHCP client isn’t initializing correctly, a soft reset won’t resolve the issue.
I proceed with a hard reset. This action completely wipes out all system configurations but keeps my data on the hard drives intact. I restart the NAS. The hard drives spin up. The power LED starts blinking, indicating that the DSM is not installed. I launch the Synology Web Assistant again, but it fails to find the NAS. I repeat the same steps using a direct connection to my MacBook. Same result.
So here I am, sitting in front of this black box. It’s up and running, but it seems to live a life of its own. I recall that I have a travel router that might provide more detailed logs for connected clients.
Seeking More Clarity: Using a Different Router
I unpack my travel router, connect it to the WLAN, and then connect both the NAS and the MacBook to the router. I check the logs and see some activity from the NAS:
daemon.notice netifd: Network device 'eth2' link is up
kern.info kernel: [  219.955222] nss-dp 3a001400.dp3 eth2: PHY Link up speed: 1000
kern.info kernel: [  219.955300] br-lan: port 2(eth2) entered forwarding state
And here are the log entries from the MacBook:
daemon.notice netifd: Network device 'eth1' link is up
kern.info kernel: [   85.954650] nss-dp 3a001200.dp2 eth1: PHY Link up speed: 1000
kern.info kernel: [   85.954811] br-lan: port 1(eth1) entered forwarding state
daemon.info dnsmasq-dhcp[4707]: DHCPDISCOVER(br-lan) c8:a3:62:07:1b:37
daemon.info dnsmasq-dhcp[4707]: DHCPOFFER(br-lan) 192.168.8.202 c8:a3:62:07:1b:37
daemon.info dnsmasq-dhcp[4707]: DHCPREQUEST(br-lan) 192.168.8.202 c8:a3:62:07:1b:37
daemon.info dnsmasq-dhcp[4707]: DHCPACK(br-lan) 192.168.8.202 c8:a3:62:07:1b:37 MBP
The MacBook establishes a physical connection over the Ethernet cable and requests an IP address from the router. The router responds with a DHCP offer. The full DHCP handshake completes successfully. As a result, my MacBook successfully gets a new IP address. But there’s nothing similar for the NAS. The physical connection works fine (1 Gbps link from the logs), but the NAS isn’t making any DHCP requests.
I reset the NAS one more time, switch to a different LAN port on the NAS, and review the router logs:
daemon.notice netifd: Network device 'eth2' link is down
kern.info kernel: [  824.964258] nss-dp 3a001400.dp3 eth2: PHY Link is down
kern.info kernel: [  824.964680] br-lan: port 2(eth2) entered disabled state
daemon.notice netifd: Network device 'eth2' link is up
kern.info kernel: [  826.964295] nss-dp 3a001400.dp3 eth2: PHY Link up speed: 1000
kern.info kernel: [  826.964382] br-lan: port 2(eth2) entered forwarding state
The pattern remains consistent:
- Link goes down (unplugging)
- Link comes up (plugging in)
- Port enters forwarding state
- But no DHCP or higher-level network activity
NAS might be trying to use a static IP outside the local network range due to a DHCP client failure. Or its network stack isn’t initializing properly. But how could this happen after a hard reset?
A Game-Changer: Discovering a Hidden Debug Tool
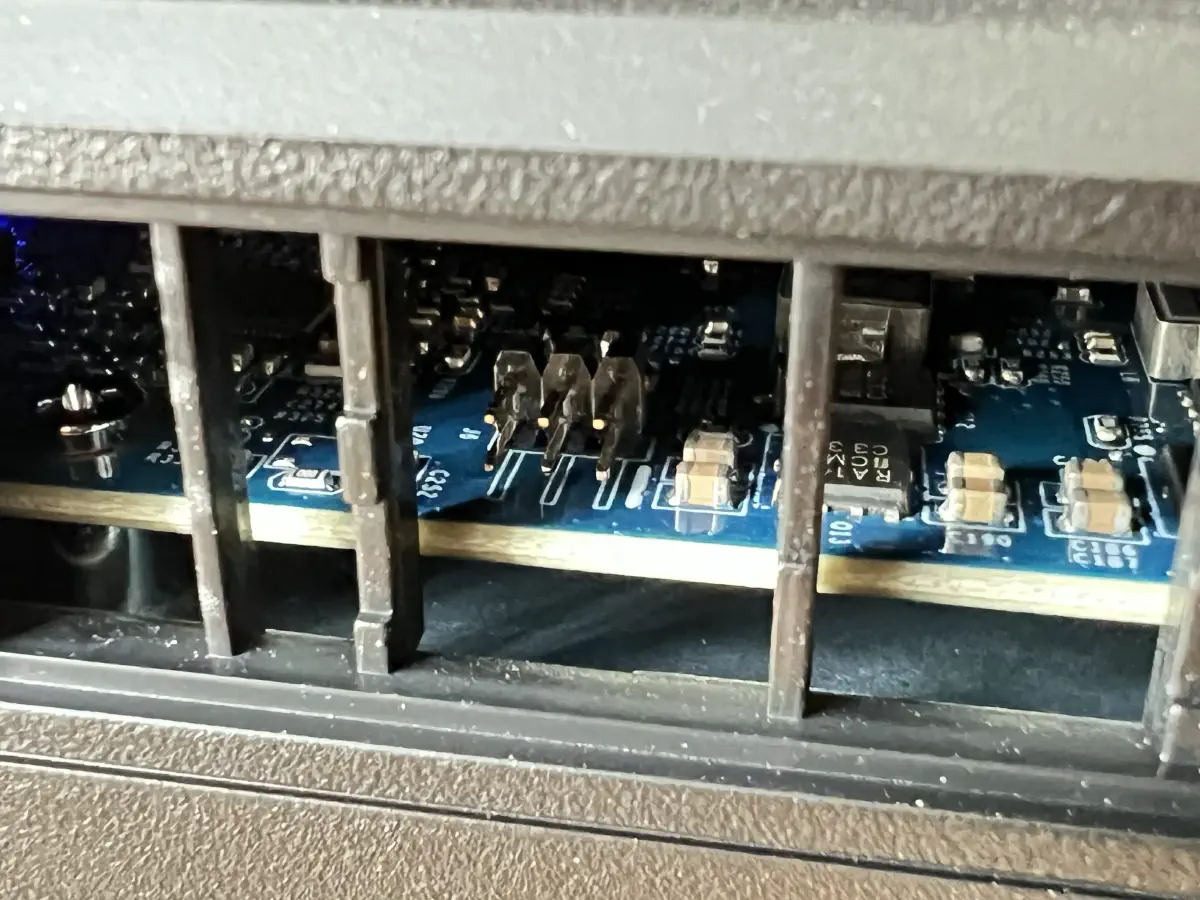
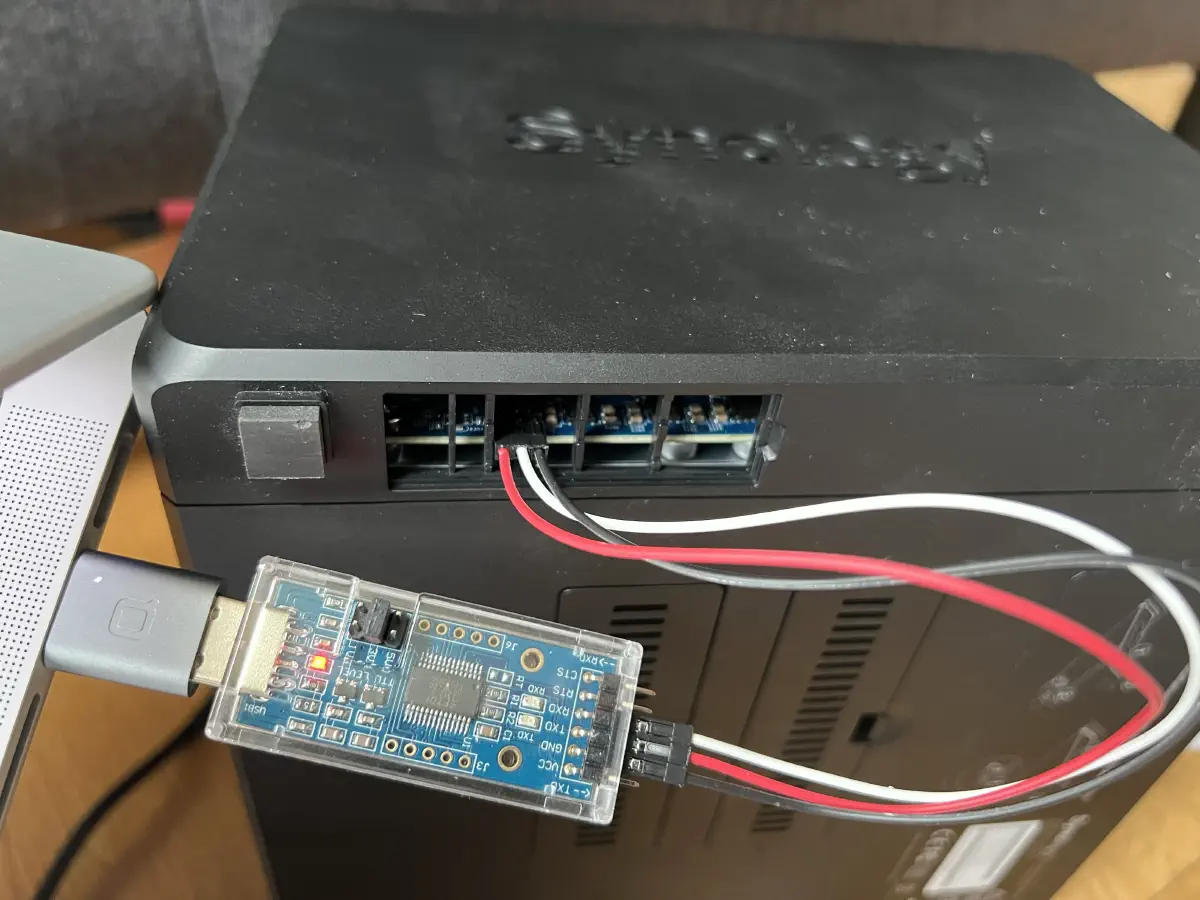
I remove all the hard drives and the SSD cache from my NAS and power it up. Same issue. While removing the SSD cache modules, which are located at the bottom of the NAS, I notice a small cover that reveals part of the motherboard. I remove the cover and see a 6-pin connector. After researching online, I discover that this is a serial console port, also known as a UART debug port , as shown below.
The 6 pins are:
- TX (Transmit): Sends data from NAS to computer
- RX (Receive): Takes data from computer to NAS
- GND (Ground): Common reference point for electrical signals
- VCC (Power): Power supply (3.3V or 5V), not used as NAS has its own power source
- CTS (Clear to Send): Flow control pin, usually not needed
- RTS (Request to Send): Flow control pin, usually not needed
This port is commonly used in embedded systems and electronic devices for debugging, monitoring, and communication. In theory, I can use a USB-to-TTL adapter to connect my MacBook to the NAS via this port and access system logs.
The MacBook has the screen command, which can open a connection to the serial console and capture the output from the connected device. The command I run is screen -L /dev/tty.usbserial-* 115200, where:
-L: Createsscreenlog.0in the current directory and logs all output to the file/dev/tty.usbserial-*: Path to the USB-serial device (*matches any serial device name). macOS creates this device when I plug in the USB-TTL adapter115200: Baud rate, the speed of data transmission over the serial connection, which is a standard value for serial devices
Strangely, I find no reference to the serial console port in the Synology documentation. And I have no idea which pin is responsible for which function. I need to figure out the pinout.
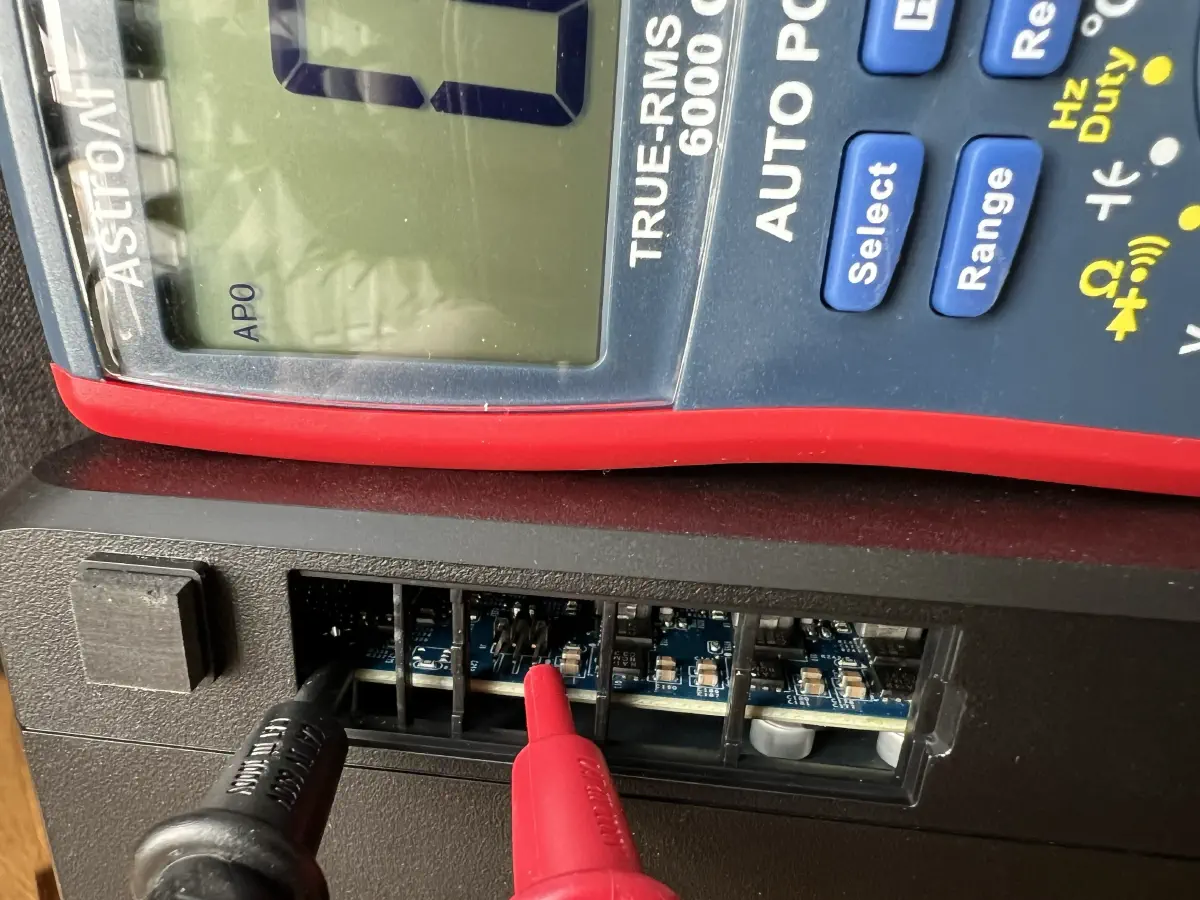
Out of the 6 pins, I only need to locate 3: GND, RX, and TX. I take a multimeter and set it to continuity mode. I connect the black probe to the metal part on the NAS motherboard and touch the red probe to each pin one by one. Finally, I hear a beep. The ground pin is found.
I connect the GND pin to the USB-TTL adapter using a black jumper wire. Next, I need to find the TX pin. I connect the white jumper wire to the adapter’s RX pin and test each pin on the NAS UART port until I see messages appear on the MacBook. This is the best feeling I’ve had in over a decade in software engineering. I can finally see what’s happening inside the NAS:
Synology ready to boot Event() Start
Synology ready to boot Event() end
Initialize secure boot and secure flash related variables
Verify the signature of the image

GNU GRUB  version 2.02~beta3
   Press "CTRL-C" for boot menu or it boots automatically in 3s.
   Press "CTRL-C" for boot menu or it boots automatically in 2s.
   Press "CTRL-C" for boot menu or it boots automatically in 1s.
   Press "CTRL-C" for boot menu or it boots automatically in 0s.

Booting 'SYNOLOGY_2'
  Checking file [/zImage]...Passed.
  Checking file [/rd.gz]...Passed.
...
Since the RX pin is typically located near the TX pin, I test the adjacent pins. After a few attempts, I find the RX pin and connect it to the adapter’s TX pin using a red jumper wire, as shown below.
I now have low-level access to the NAS’s system logs and can control the device.
Digging Deeper: Why Are DHCP Requests Not Sent?
Synology’s DSM is based on Linux. At the end of the boot process, I see a login prompt that says SynologyNAS login:. I try different combinations of root and admin passwords but can’t get in. I restart the NAS and access the GRUB bootloader, which shows the following settings:
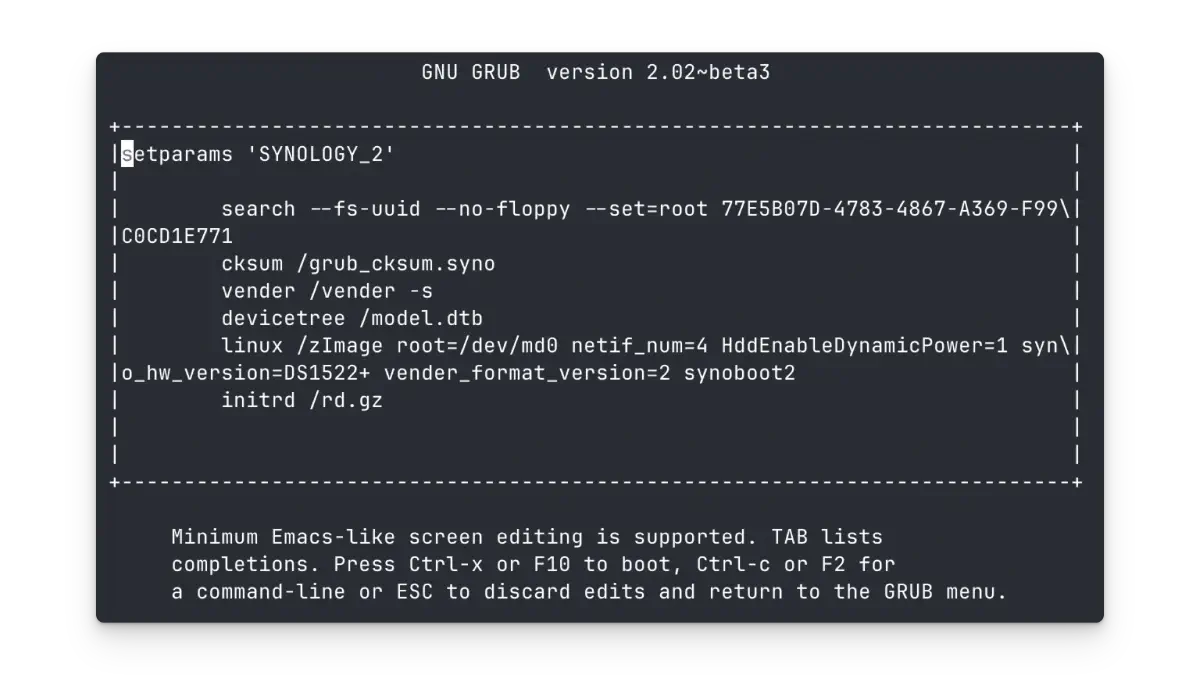
I add init=/bin/bash to the end of the line that starts with linux. This parameter tells the kernel to execute /bin/bash as the initial process instead of the default init system. This should allow me to bypass the usual user authentication. But it doesn’t work. I still see the Synology login prompt. I try a few other values for init, but without success.
It seems that something is either ignoring or overriding this parameter. I notice initrd /rd.gz in the GRUB bootloader, which could be the cause. But when I remove it, the system fails to boot. It turns out that /rd.gz is a compressed initial RAM disk image containing a minimal root filesystem and essential drivers needed to boot the system. GRUB loads this image into memory for the kernel’s use during the early stages of the boot process. So, this leaves me with limited options.
How come I haven’t checked the logs yet?
I go through the boot logs and find something strange. At the end of the boot process, only the loopback network interface is up. All the Ethernet interfaces are down. This explains why the NAS doesn’t send DHCP requests when connected to the router and is not visible on the local network.
I return to the GRUB and enable more detailed logging via debug loglevel=7 ignore_loglevel parameters. This provides more information but nothing directly relevant to the issue. I see that the network module is loaded, but no Ethernet interfaces are initialized:
:: Loading module r8168 ... [  OK  ]
... [  OK  ]
lo        Link encap:Local Loopback
          inet addr:127.0.0.1  Mask:255.0.0.0
          UP LOOPBACK RUNNING  MTU:65536  Metric:1
          RX packets:0 errors:0 dropped:0 overruns:0 frame:0
          TX packets:0 errors:0 dropped:0 overruns:0 carrier:0
          collisions:0 txqueuelen:1
          RX bytes:0 (0.0 B)  TX bytes:0 (0.0 B)
I wonder if there’s a way to force the system to bring up the network interfaces. The ip=::::::dhcp parameter tells the kernel to use DHCP for all network interfaces. I update the GRUB configuration, press Ctrl-x to continue booting, and guess what, the Ethernet interfaces come up. The NAS successfully gets a new IP address from the router:
...
:: Loading module r8168[   12.555232] r8168 Gigabit Ethernet driver 8.045.12-NAPI loaded
...
udhcpc: started, v1.30.1
eth0      Link encap:Ethernet  HWaddr 90:09:D0:56:D7:2E
          inet addr:169.254.183.221  Bcast:169.254.255.255  Mask:255.255.0.0
          UP BROADCAST RUNNING MULTICAST  MTU:1500  Metric:1
          RX packets:0 errors:0 dropped:0 overruns:0 frame:0
          TX packets:6 errors:0 dropped:0 overruns:0 carrier:0
          collisions:0 txqueuelen:1000
          RX bytes:0 (0.0 B)  TX bytes:642 (642.0 B)
          Interrupt:77 Base address:0x8000

eth1      Link encap:Ethernet  HWaddr 90:09:D0:56:D7:11
          UP BROADCAST MULTICAST  MTU:1500  Metric:1
          RX packets:0 errors:0 dropped:0 overruns:0 frame:0
          TX packets:0 errors:0 dropped:0 overruns:0 carrier:0
          collisions:0 txqueuelen:1000
          RX bytes:0 (0.0 B)  TX bytes:0 (0.0 B)
          Interrupt:76 Base address:0xe000

eth2      Link encap:Ethernet  HWaddr 90:09:D0:56:D7:32
          UP BROADCAST MULTICAST  MTU:1500  Metric:1
          RX packets:0 errors:0 dropped:0 overruns:0 frame:0
          TX packets:0 errors:0 dropped:0 overruns:0 carrier:0
          collisions:0 txqueuelen:1000
          RX bytes:0 (0.0 B)  TX bytes:0 (0.0 B)
          Interrupt:75 Base address:0xa000

eth3      Link encap:Ethernet  HWaddr 90:09:D0:56:D7:44
          UP BROADCAST MULTICAST  MTU:1500  Metric:1
          RX packets:0 errors:0 dropped:0 overruns:0 frame:0
          TX packets:0 errors:0 dropped:0 overruns:0 carrier:0
          collisions:0 txqueuelen:1000
          RX bytes:0 (0.0 B)  TX bytes:0 (0.0 B)
          Interrupt:78 Base address:0xa000

lo        Link encap:Local Loopback
          inet addr:127.0.0.1  Mask:255.0.0.0
          UP LOOPBACK RUNNING  MTU:65536  Metric:1
          RX packets:0 errors:0 dropped:0 overruns:0 frame:0
          TX packets:0 errors:0 dropped:0 overruns:0 carrier:0
          collisions:0 txqueuelen:1
          RX bytes:0 (0.0 B)  TX bytes:0 (0.0 B)
I open the Synology Web Assistant, and it finds the NAS. It prompts me to reinstall the DSM, saying that I need to insert the hard drives.
Uncovering the Root Cause: PCIe Initialization Behavior
I put the hard drives back, start the NAS, and have the same issue. The NAS is no longer available on the local network, even when I use the ip=::::::dhcp kernel parameter. I remove the hard drives and use the same configuration that led to the previously successful run. But the issue persists.
Luckily, I saved the log from the successful run. I put the hard drives back and get a new log from the failed run. I compare both logs and notice a minor difference in the network module loading:
# Successful run
:: Loading module r8168[ 12.559868] r8168 Gigabit Ethernet driver 8.045.12-NAPI loaded

# Failed run
:: Loading module r8168 ... [  OK  ]
The failed run uses the default r8168 network driver, while the successful run loads the r8168 NAPI Ethernet driver, an improved version of the default one. I have no idea why it happens. I try to force the use of the NAPI driver by setting the r8168.use_napi=1 kernel parameter, but it has no effect.
I continue comparing the logs and notice a difference in PCI bridge initialization early in the boot process. During the successful run, the network interfaces are detected through PCIe enumeration as follows:
[    1.089159] pci 0000:00:01.2: PCI bridge to [bus 01]
[    1.096159] pci 0000:00:01.3: PCI bridge to [bus 02]
[    1.103160] pci 0000:00:01.4: PCI bridge to [bus 03-08]
[    1.108880] pci 0000:03:00.0: PCI bridge to [bus 04-08]
[    1.116168] pci 0000:04:00.0: PCI bridge to [bus 05]
[    1.123169] pci 0000:04:02.0: PCI bridge to [bus 06]
[    1.130170] pci 0000:04:06.0: PCI bridge to [bus 07]
[    1.137171] pci 0000:04:0e.0: PCI bridge to [bus 08]
[    1.144167] pci 0000:00:01.5: PCI bridge to [bus 09]
[    1.155454] pci 0000:00:08.1: PCI bridge to [bus 0a]
[    1.160473] pci 0000:00:08.2: PCI bridge to [bus 0b]
There is a
PCIe switch
at 0000:03:00.0, which serves as a root for the 4 LAN ports connected beneath it:
0000:00:01.4 (Root Bridge)
    └── 0000:03:00.0 (PCIe Switch)
        ├── 0000:04:00.0 (LAN Port)
        ├── 0000:04:02.0 (LAN Port)
        ├── 0000:04:06.0 (LAN Port)
        └── 0000:04:0e.0 (LAN Port)
However, in the failed run, the PCIe switch is missing:
[    1.086587] pci 0000:00:01.2: PCI bridge to [bus 01]
[    1.093587] pci 0000:00:01.3: PCI bridge to [bus 02]
[    1.098421] pci 0000:00:01.4: PCI bridge to [bus 03]
[    1.105589] pci 0000:00:01.5: PCI bridge to [bus 04]
[    1.116882] pci 0000:00:08.1: PCI bridge to [bus 05]
[    1.121898] pci 0000:00:08.2: PCI bridge to [bus 06]
When the switch fails to enumerate properly, all the network ports behind it become inaccessible. This explains why the default network module is loaded and no Ethernet interfaces are brought up.
There could be few reasons for PCIe switch initialization issues, such as Synology firmware problems, incorrect BIOS settings, or even power supply instability. I check the DSM release notes and see that an update was released about a week before the issue began. This leads me to think about the system as the following layers:
- Layer 1: DSM (Operating System & Settings)
- Layer 2: Firmware (Controls hardware initialization)
- Layer 3: Hardware (Physical components)
When I reset the NAS, it only affected Layer 1 (DSM), while the recent update could have modified Layer 2 (Firmware). Since firmware settings are stored in non-volatile memory, they persist through normal system resets until explicitly changed by another firmware update. This explains why the PCIe switch initialization issues continued even after resetting the system.
I restart the NAS few more times. During the last restart, the network PCIe bridges initialize correctly. This could be due to a timing issue or the proper initialization sequence. But I take advantage of this random event to run the Synology Web Assistant, discover the NAS, and install the DSM.
Reinstalling DSM and Fixing Network Connectivity
After reinstalling DSM, the NAS works fine. I check the logs during the installation and see this:
------------upgrade
Begin upgrade procedure
Found an upgrade file on data volume. Begin upgrade
...
Found /tmpData/SynoUpgrade.tar.gz. Hide it.
'/tmpData/SynoUpgrade.tar.gz' -> '/tmpData/.SynoUpgrade.tar.gz'
Found /tmpData/SynoUpgradeIndexdb.txz. Hide it.
'/tmpData/SynoUpgradeIndexdb.txz' -> '/tmpData/.SynoUpgradeIndexdb.txz'
Found /tmpData/SynoUpgradeSynohdpackImg.txz. Hide it.
'/tmpData/SynoUpgradeSynohdpackImg.txz' -> '/tmpData/.SynoUpgradeSynohdpackImg.txz'
Do [/bin/tar xf /tmpData/.SynoUpgrade.tar.gz -C /tmpRoot]... try=1/2
Success to untar main tarball
Deploying default configurations
Untaring .SynoUpgradeIndexdb.txz
Untaring .SynoUpgradeSynohdpackImg.txz
DataMnt and RootMnt are same devices. No need to move packages
Touching /tmpRoot/var/.UpgradeBootup
...
[   78.624775] synobios open /dev/ttyS1 success
[   78.638434] correction with 0x00
[   78.648209] synobios: load, major number 201
[   78.652478] Brand: Synology
[   78.655273] Model: DS-1522+
[   78.658066] This is default settings: set group disks wakeup number to 1, spinup time deno 1
[   78.666517] synobios cpu_arch proc entry initialized
[   78.671478] synobios crypto_hw proc entry initialized
[   78.676524] synobios syno_platform proc entry initialized
mknod: /dev/synobios: File exists
Starting /usr/syno/bin/synohdcfgen...
/usr/syno/bin/synohdcfgen returns 0
[   78.685588] Module [r1000_synobios] is removed.
[   78.696717] synobios: unload
Release upgrade preserved space temporarily in upgrade bootup.
End upgrade procedure
============upgrade
I restart the NAS few times. No issues. The update process extracts and applies firmware-related components, potentially overwriting any corrupted firmware settings with the correct ones. This could explain the resolution of the PCIe initialization problem.
I configure the NAS to use a static IP from a reserved range outside the DHCP pool. I do this to ensure consistent, reliable access to my storage and services regardless of network changes or reboots. Everything works as expected.
Reflections and Takeaways
Low-Level Access is a Game-Changer
Accessing the serial console port showed me exactly what was going on during boot, turning the NAS from a black box into an open book. It let me see bootloader logs and kernel initialization, which helped me figure out why the network interfaces weren’t coming up. I learned that low-level access is essential when standard troubleshooting methods fall short.
Systematic Troubleshooting is Key
I started with the basics. Checked cables, ports, and DHCP settings before diving deeper. Isolating variables one by one, such as using direct connections and minimal network setups, helped me narrow down the cause. Documenting each step allowed me to save the log from a successful run, which played a key role in finding the core issue. This showed me the power of a structured and systematic approach.
Persistence and Curiosity Lead to Breakthroughs
I tested countless ideas, compared logs line by line, and kept digging even when nothing made sense. When I first found the UART port, I didn’t even know how use it. But I kept learning and experimenting until I uncovered the root cause. This reminded me that breakthroughs often result from persistence, curiosity, and a willingness to push beyond your current skill level.
Final Thoughts and Looking Ahead
I still don’t know exactly what happened that morning when the NAS disappeared from my local network. I lost all system logs when I did the hard reset and only discovered the serial console port afterward. Based on the timing, I can only speculate that the latest Synology update corrupted the system configuration.
But I learned a great deal during this investigation, and I added a powerful tool under my belt—the UART debug port. If I’m lucky (or unlucky) and the issue occurs again, I won’t need to reset anything. I’ll just unwrap the USB-TTL adapter, connect my MacBook to the NAS, log in with my admin password, and check the system logs to get the answers I couldn’t get this time.
Happy debugging!